Cervical Spondylosis
A ‘pain in the neck’ is commonly used not only to describe an ailment but to describe an unpleasant situation that nearly 34% of the people have experienced at some point in their life. The neck is the most mobile part of the spine and is moved nearly 6000 times a day. Therefore, the neck is a common target for disease and trauma because it is subjected to marked stress and strain during daily activities. We shall describe the vertebral column before embarking on a discussion on the causes and consequences of neck pain.
The vertebral column
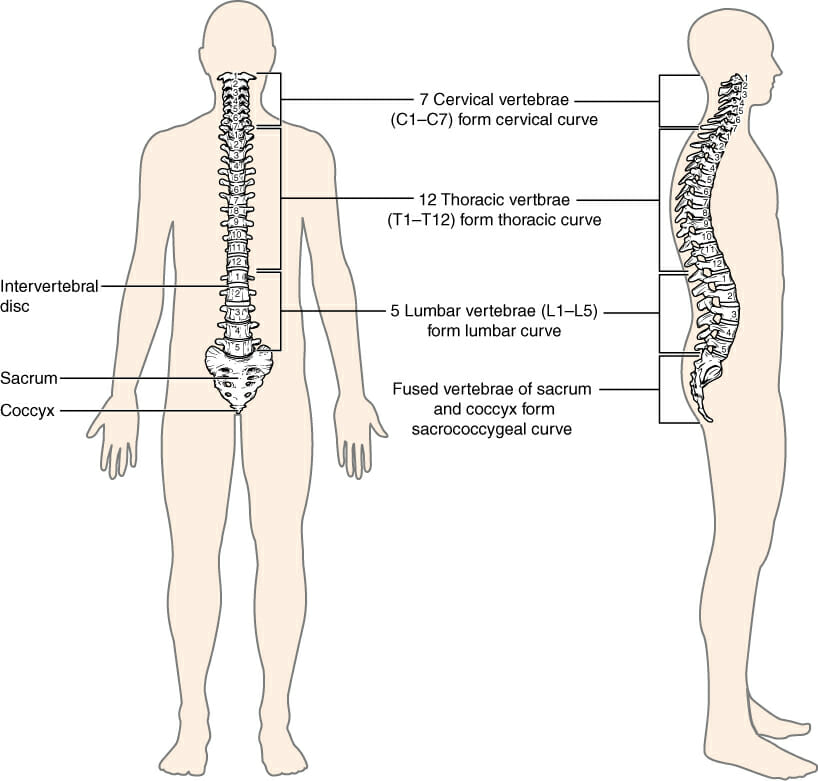
The vertebral column or backbone is an important part of our body. It not only supports the trunk and the head but it also plays an important role in our movement and protects the delicate spinal cord. The vertebral column consists of 32 vertebrae. The first 7 from the top form the cervical vertebrae, the next 12 constitute the thoracic vertebrae which articulate with the ribs and the remaining 5 constitute the lumbar vertebrae. Below the lumber lies the sacrum made up of 5 fused vertebrae which join the spine with the pelvic bone. The coccyx, or the tail bone, present at the end of the. The vertebral column consists of 3-4 fused vertebrae.
Each vertebra consists of a cylindrical part which is convex in the front and flattened behind. This flattened area forms the front part of the canal through which the spinal cord and nerve roots pass. The vertebral arch surrounds the canal and protects the structures within.
Each vertebra is attached to its neighbor by joints between the vertebral bodies and the arches. Between two vertebrae are present the inter-vertebral discs surrounded by fluid and a protective membrane. These discs facilitate the movements of the spine and cushion it from shocks. The extension of the spine is controlled by ligaments which run along the entire length of the vertebral column.
The cervical spine
The first two vertebrae of the spinal column are called the atlas and the axis and they are modified so as to support the skill and facilitate the movements of the skull respectively. The location of the seventh cervical vertebra can easily be traced by bending one’s head forward as it tends to protrude out. There are grooves in the vertebrae through which pass the major blood and the spinal cord. The spinal cord gives rise to nerve roots which form the nerves and they carry motor and sensory fibers to the different parts of the body. A map of the nerve fibers originating from the different cervical vertebrae is given in the figure.
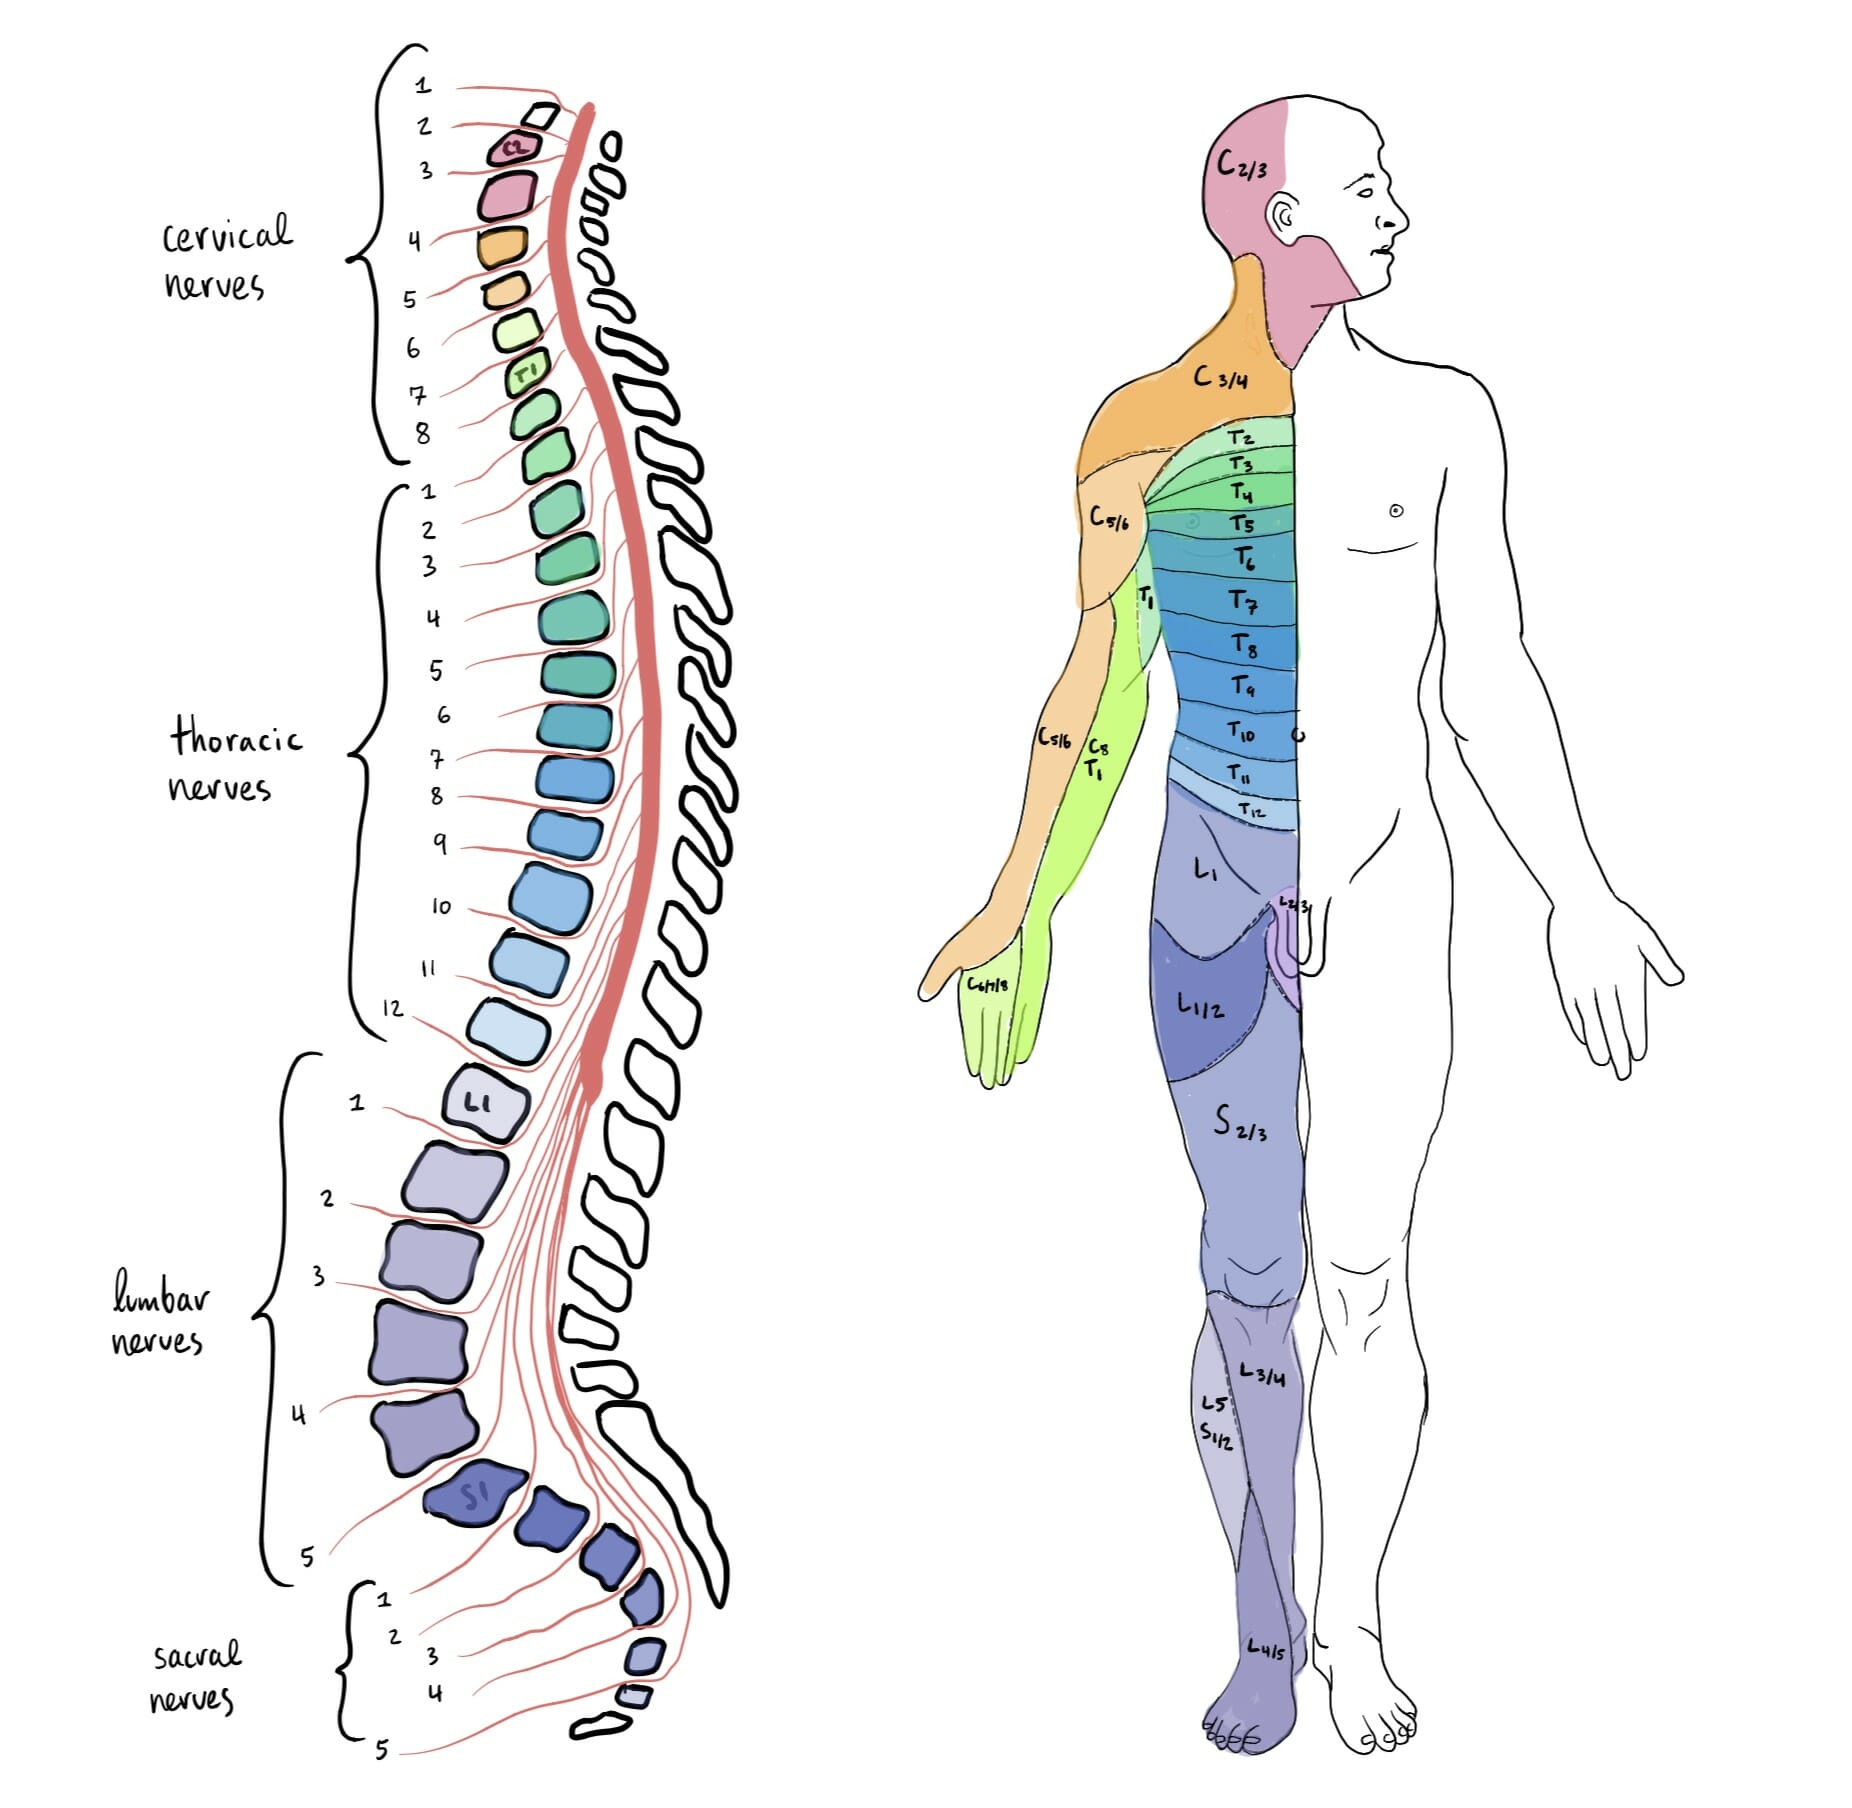
A proper alignment of the vertebrae is a must. If they are not aligned then they may press on the spinal cord or the nerve roots causing pain, loss of sensation, or stiffness of the neck.
Cervical Spondylosis (cervical osteoarthritis)
Spondylosis is a degenerative disease of the spine which leads to the narrowing of the spinal canal. It is postulated that cervical spondylosis is caused by the wear and tear of the vertebral body, intervertebral joints, and discs. There is an increase in density and thickening of the vertebrae and the intervertebral disc space decreases. The changes that occur in and around the intervertebral discs is termed as spondylosis. The outgrowths from the vertebra may protrude and press upon the spinal cord or the nerve roots. This leads to the clinical symptoms associated with spondylosis.
Symptoms:
The symptoms of cervical spondylosis depend upon the vertebra, the nerve roots, and the side of the body that has been affected as well as the extent of the damage. Pain in the neck or arms, headache, vertigo, dizziness, stiff neck, auditory disturbances, off-balance, tingling sensation in the arms are some of the symptoms associated with spondylosis.
Cervical spondylosis is common amongst weight lifters, those associated with long hours at the desk, driving, and those in the habit of using multiple soft pillows, those with drooping shoulders, and a stiff neck.
Asanas recommended for those suffering from cervical spondylosis
The asanas described below are aimed at increasing the intervertebral space by elongating the neck; aligning the cervical vertebra so that any compression of the nerve roots of misalignment of the vertebra gets corrected. This article describes some of the asanas which provide relief and help one overcome bouts of cervical pain.
General instructions for all the asanas
- Ensure that the neck is relaxed and the shoulders are not lifted up.
- The trapezius muscles should be rolling back and the shoulder blades should move closer to each other at the back.
- Do not clench your teeth or tighten the jaws.
Note of Caution
The asanas described here are best done under the guidance of an experienced teacher. If the pain persists or increases after going into the postures, it is an indication that the asana has not been done correctly and it is advisable to come out of the asana; readjust it and attempt it once again. These asanas provide symptomatic relief and their regular practice helps eradicate the disease.
The asanas described below are not classical asanas and these may be performed by the patient during the acute phase of pain.
- Join the two ends of a long belt or rope and place it over the shoulders in the manner in which one wears a back-pack. The edges of the belt which move over the shoulders should be pulled down with hands around your sacro-lumbar region. The shoulder and the trapezius muscles roll back, the upper arms and the shoulder blades will move closer to each other. Continue pulling the belt/rope towards the hips and stay in this position for at least 3-4 minutes.
- Entwine the fingers, extend the hands behind the back keeping the elbows straight. Roll the shoulders back, and turn the upper arms. Ask somebody to tie a belt underneath the armpits and over the shoulders. Tighten the belt and move the shoulders down. Stay in this position for 5-10 minutes.
- Lie on the back with the neck on the edge of a hard bed or a platform. Keep the head in a hanging position over the edge of the bed/platform. Roll a blanket and place it under the neck to support the entire curvature of the neck. Move the shoulders back towards the lumbar. The neck can then be moved from side to side. This position is comfortable as the neck is well supported. If the position of the neck or shoulders is not correct then there is discomfort. To intensify the effect, insert a weight of about 2 to 5 kgs through a belt, loop the belt and place it on the outer edge of the chin bone. Stay in this position for about 10 mins.
Caution: Take care that the belt does not slide down on the neck and choke the throat.
- Lie on your back as in #2. Bend the knees, bring the feet closer to the hips, and grip the ankles with the palms. Lift the hips off the bed/platform and move the head back.
Caution: The top of the shoulders and not the neck is on the edge of the bed/platform.
- Half Uttanasana: Bend forward and rest the bottom edge of the chin bone on a chair or stool or a window sill. Keep the chest parallel to the floor. Press the bottom edge of the chin bone on the window sill or chair. Place the palms adjacent to the chin with the elbows moving down.
Half Uttanasana can also be done by resting the entire chest on a table. The bottom edge of the chin is placed on a brick or a folded blanket about 6-8 inches thick. Entwine the palms and extend the hands behind the back.
This section describes modifications of the classical asanas which are described in Light on Yoga by Yogacharya B.K.S. Iyengar.
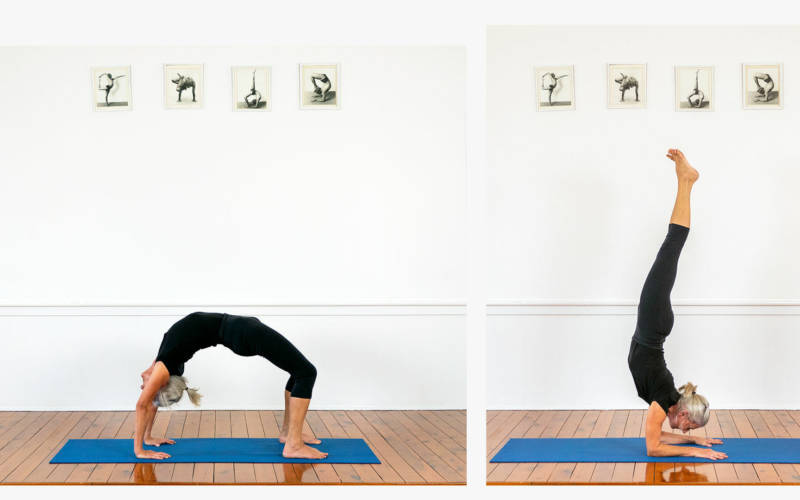
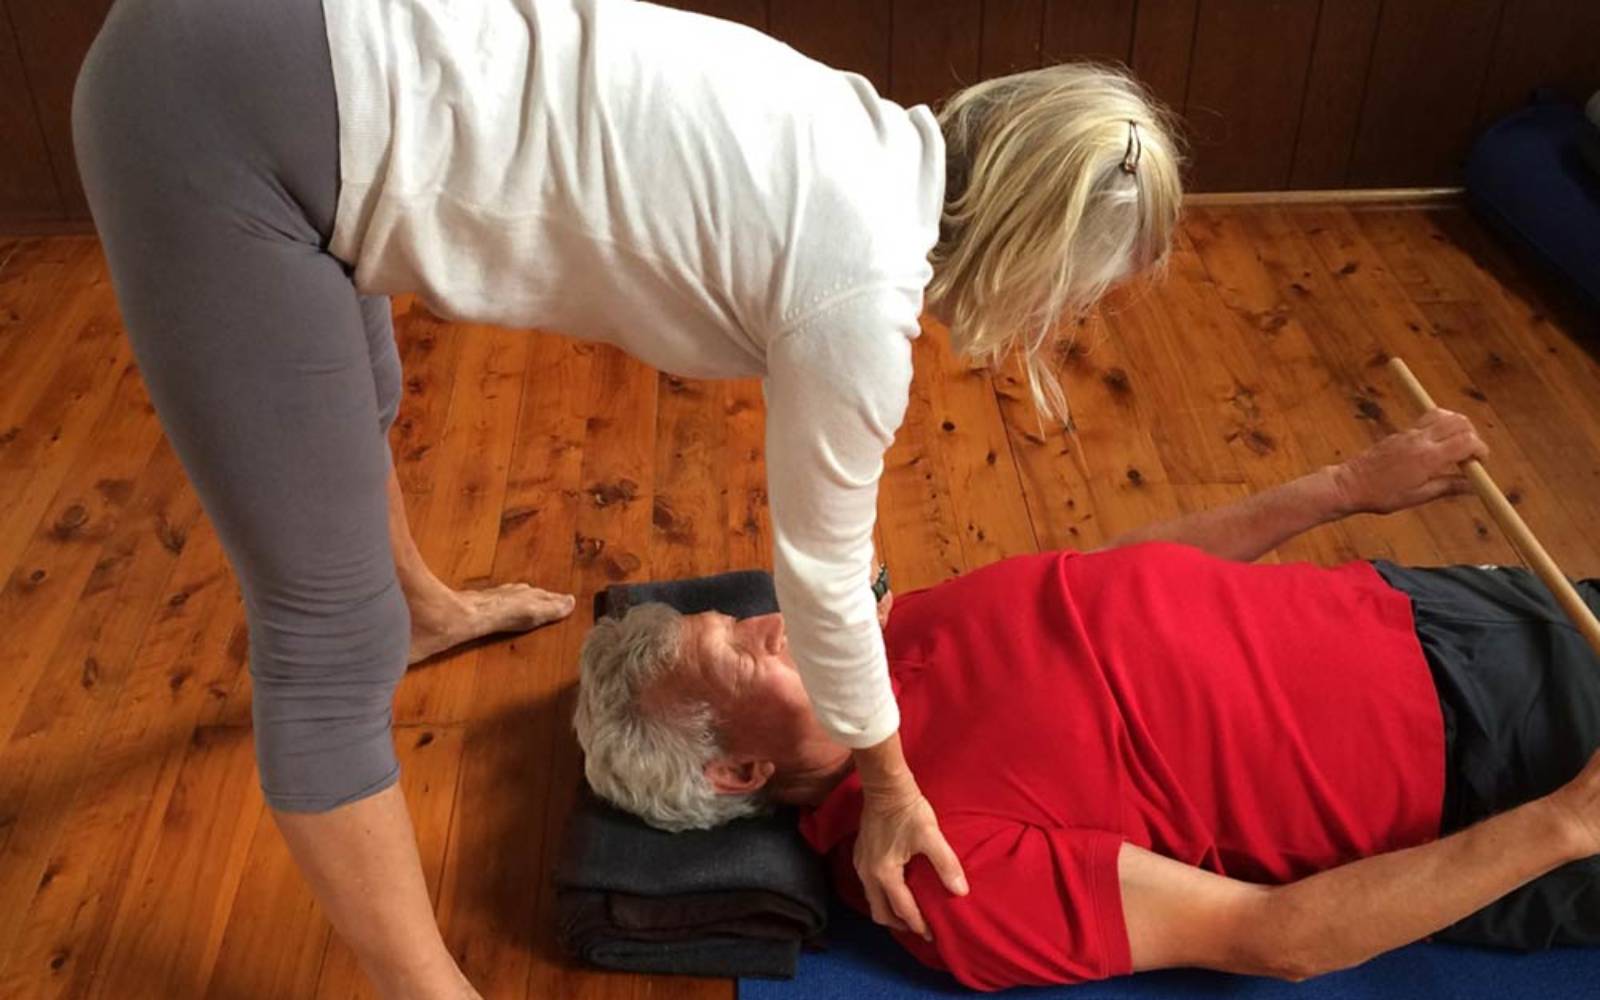
- Adho Mukha Svanasana: Go into Adho Mukha Svanasana. Keep the head hanging loose or move the crown of the head towards the floor. Move the shoulders away from the wall. Wear a belt as described in #1 and the assistant teacher can pull this belt towards the hip. Pull the belt in the same plane as the spine.
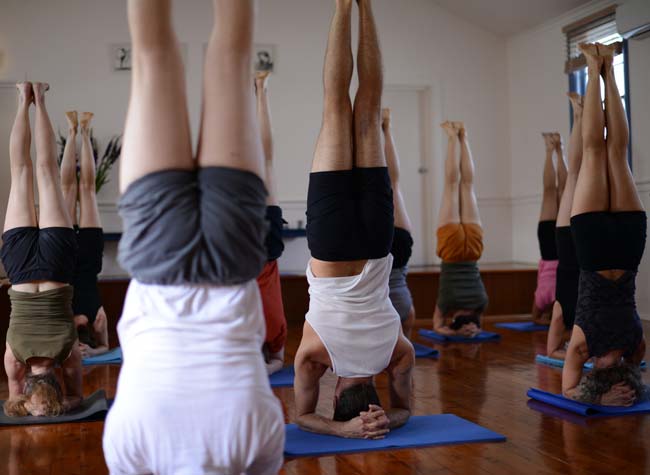
- Sirsasana is done against a wall with the help of two chairs or boxes or stools of even heights kept next to each other. Put a blanket on each of the chairs. Then, keep the head between the chairs and let the front edge of the shoulders (the region near the collar bone) rest on the seat of the chair. Loft the legs up and rest them against the wall. Relax the hands or entwine them in the front over the seat of the chair. Stay in this position for 5-6 minutes.
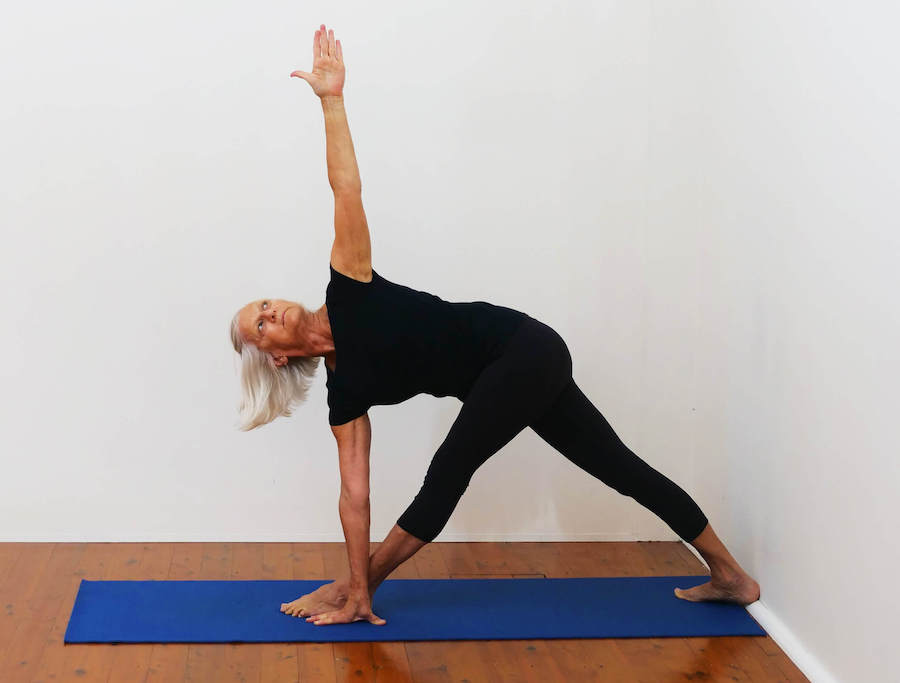
- Standing asanas: Do Trikonasana, Parsva Konasana, and Ardha Candrasana near the edge of a wall or a tressler such that the back of the head and neck are supported on the wall. Curve the neck curving back.
- Parsvottanasana: Join the palms behind the back with the fingers facing the ceiling. Move the shoulders down and the upper arms and shoulder blades towards each other. Keep the head erect.
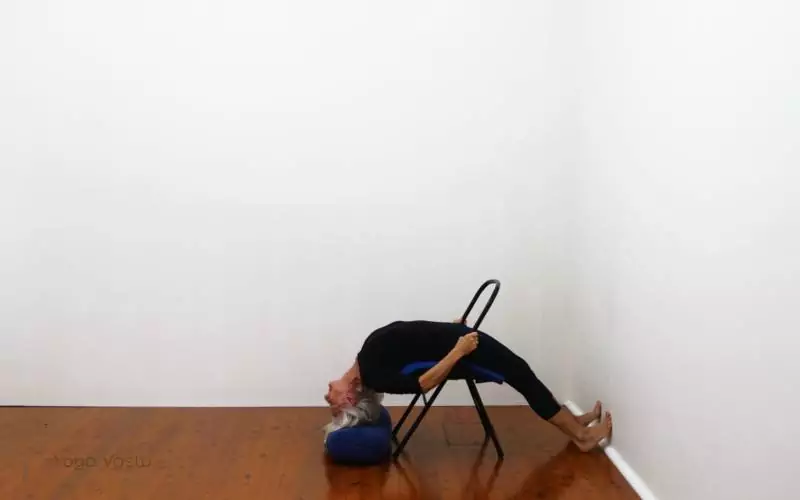
- Setu Bandha Sarvangasana. Do it by resting the shoulders on 6-8 inch thick blankets or a bolster. Relax the head or let the back of the head rest on the floor. Use a chair, if required to support the back.
This story was originally published in Yoga Rahasya.